


| Bookmark Name | Actions |
|---|
Deleting an Existing Field
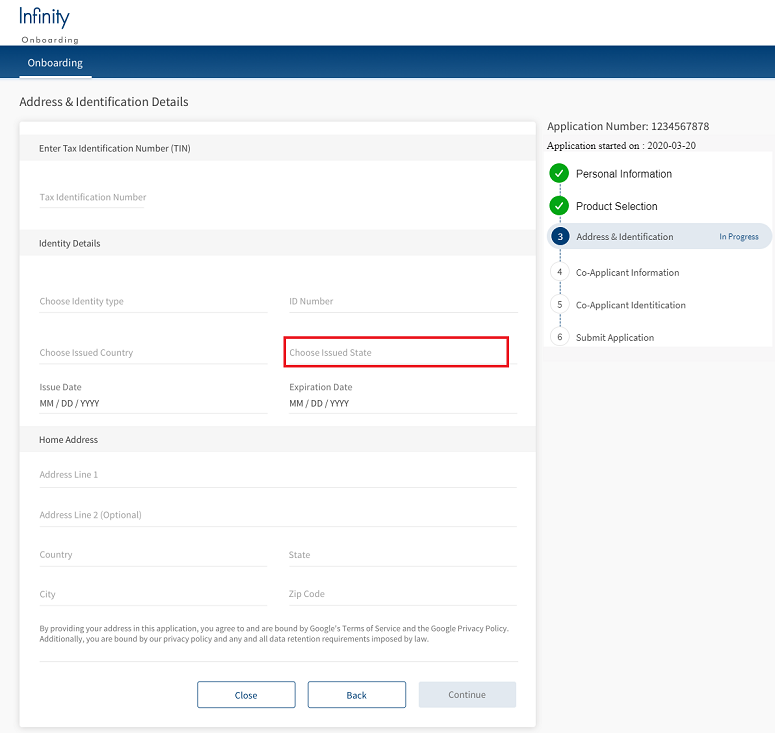
This doc explains how to delete an existing field from a module. Consider that you want to delete the Choose Issued State field from the Address & Identification module. Currently, the Address & Identification module is as follows.
You can disable the functionality of the Choose Issued State field in the following two possible ways:
- Turn off the visibility of the Choose Issued State field in the Infinity Onboardng Visualizer project. For more information about how to turn off the visibility, refer to UI/UX Modifications.
- Delete the fields that are associated with the Choose Issued State field. To do so, you must make the following changes:NOTE:
- As the Choose Issued State field is already available in Transact, you need not configure the DBX DB.
- The aforementioned changes are sufficient for the Applicant and Co-Applicant sections.
Client Application Extensions
This section provides information about the client-side changes that are required to delete the Choose Issued State field from the Address & Identification module. Client Application Extensions involve configuring the following elements:
UI/UX Modifications:
UI/UX modifications represent the changes that are required to delete the Choose Issued State field. As the UI is non-extensible, you must update the required forms directly. To do so, make the following configurations in the Infinity Onboarding Visualizer project.
- In the Project explorer, expand the Modules section.
- Go to IdentityModule > frmIdentityDetails.
- Expand the frmIdentityDetails form, and then select the flxState flex container.
- From the Properties panel, navigate to the Look tab.
- Under the General section, turn off the visibility feature.
The visibility of the flxState flex container is now turned off. Therefore, you will not be able to see the field in the form.
NOTE: The layout of the screens is created by the designers of the implementation team. Based on the layout design, the developers of the implementation team configure the layout properties.
Form Controller Extension
To make a change in a form, you cannot directly modify the code in the Form Controller. You must always create a Form Controller Extension and modify the code as required. Form Controller Extension is required to validate the new modifications. It includes operations such as the configuring JSON payload, fetching the back-end response, and mapping the error modules.
In the case of deleting the Choose Issued State field, you must delete the field from the JSON payload and the validations that are associated with the Choose Issued State field. To do so, follow these steps.
- In the Project explorer, expand the Modules section.
- Right-click the require tab, and then select New Require module. A new JS file is created.
- Rename the js file to IdentityControllerExtension.
- Define the following functions in the
IdentityControllerExtensionfile. These functions override the functionality of the functions defined for the Choose Issued State field in the Form Controller of the frmIdentityDetails form.- formIdentityJSON()
formIdentityJSON: function() { var payload = this.super('formIdentityJSON', []); delete payload.IssuedState; return payload; } - validateCountryAndState()
validateCountryAndState: function() { var addComp = this.getAddressComponent(); var country = ""; if (!this.isCountryHidden && this.isGenericComponent) { country = addComp.getCountry(); } //var state = addComp.getState(); var regex = applicationManager.getConfigurationManager().getConfigurationValue("IDNumberRegex"); if (this.isGenericComponent && !this.isCountryHidden && (country.trim() == "" || !country.match(regex))) { this.view.setContentOffset({ x: 0, y: 0 }); addComp.flxError.isVisible = true; addComp.lblError.text = "Please enter a valid Country"; addComp.flxSeparator3.skin = applicationManager.getConfigurationManager().getConfigurationValue("underlineErrorSkin"); this.AdjustScreen(); return false; } /* else if(state.trim() == "" || !state.match(regex)){ this.view.setContentOffset({x:0,y:0}); addComp.flxError.isVisible = true; addComp.lblError.text = "Please enter a valid State"; addComp.flxSeparator4.skin = applicationManager.getConfigurationManager().getConfigurationValue("underlineErrorSkin"); this.AdjustScreen(); return false; } */ return true } - successGetIdentity()
successGetIdentity: function(res) {
    var scope = this;
    if (res["data"]) {
        this.view.IdentityDetails.atbxTINNumber.tbxAnimatedKA.text = res["data"].TaxIdNum;
        this.view.IdentityDetails.atbxIdNumber.tbxAnimatedKA.text = res['data'].IdNum;
        this.view.IdentityDetails.setCountry(res['data'].IssuedCountry);
        // Removing issued state response from being populated
        // this.view.IdentityDetails.setState(res['data'].IssuedState);
        var issuedate = this.newDateFormat(res['data'].IssuedDate);
        this.view.IdentityDetails.issueDateComponent.setText(issuedate);
        var expirydate = this.newDateFormat(res['data'].ExpirationDate);
        this.view.IdentityDetails.expiryDateComponent.setText(expirydate);
    }
    if (scope.context.isNewApplication === true) {
        scope.setScannedOrUploadedDocValues();
    }
    this.changeContinueButtonState();
}
- formIdentityJSON()
- After defining the functions, link the new extension file to your ModuleConfig file of the Address & Identification module. To do so, go to Project > Reference Architecture Extensions > PersonalInfoModule > Config > ModuleConfig.
Add the following code in the Forms method:"ControllerExtensions": ["IdentityControllerExtension"]
Configuring Spotlight
The Spotlight configurations that are required to delete the Choose Issued State field are similar to the Spotlight configurations described in the Mandatory Field Validations document. The only difference is that you must delete the Choose Issued State field instead of the Last Name field. For more information about how to configure the Spotlight app, refer to Configuring Spotlight for Mandatory Field Validations.
Server-side Extensions
This section provides information about the server-side changes that are required to delete the Choose Issued State field from the Address & Identification module.
After you create and configure new fields on the client-side, you must configure the server-side implementations to bind the UI elements with the back-end data. This involves configuring the following elements:
Java Integration Service
The Java Service section explains about how to extend the existing Data Transfer Objects to delete the references of the Choose Issued State field.
IMPORTANT: Before configuring Java Integration Service, ensure to set up an IDE and configure the server-side code.
To modify the required java service, follow these steps.
- Open your Eclipse project.
- To remove usage of the Choose Issued State field, you must extend the functionality of the
resource implfile in com.temenos.onboarding.extn.resource.impl. The extension file overrides the existing fetch/update methods of the identityInfo DTO. To do so, create a new class namedIdentitityInfoResourceImplExtn.java.package com.temenos.onboarding.extn.resource.impl; import com.konylabs.middleware.controller.DataControllerRequest; import com.temenos.onboarding.dto.IdentityInfoDTO; import com.temenos.onboarding.resource.impl.IdentityInfoResourceImpl; public class IdentitityInfoResourceImplExtn extends IdentityInfoResourceImpl { @Override protected IdentityInfoDTO populateIdentityInfoDetails(DataControllerRequest dcRequest) { IdentityInfoDTO identityInfoDTO=new IdentityInfoDTO(); identityInfoDTO.setTaxIdNum(dcRequest.getParameter("TaxIdNum")); identityInfoDTO.setIdType(dcRequest.getParameter("IDType")); identityInfoDTO.setIdNum(dcRequest.getParameter("IdNum")); identityInfoDTO.setIssuedCountry(dcRequest.getParameter("IssuedCountry")); identityInfoDTO.setExpirationDate(dcRequest.getParameter("ExpirationDate")); identityInfoDTO.setDateOfBirth(dcRequest.getParameter("DateOfBirth")); return identityInfoDTO; } }
Experience API Changes in Quantum Fabric
To remove the functionality of the Choose Issued State field, you must delete the data associated with it but what if you want to re-enable this field in the future?
In this case, you need not make any modification to the Onboarding Fabric application. If you want to delete the field permanently, you must delete the data associated with it from the Onboarding Fabric application. To do so, follow these steps.
- Sign in to your Quantum Fabric Console. The applications page opens.
- Open the InfinityOnBoarding app from the Applications page.
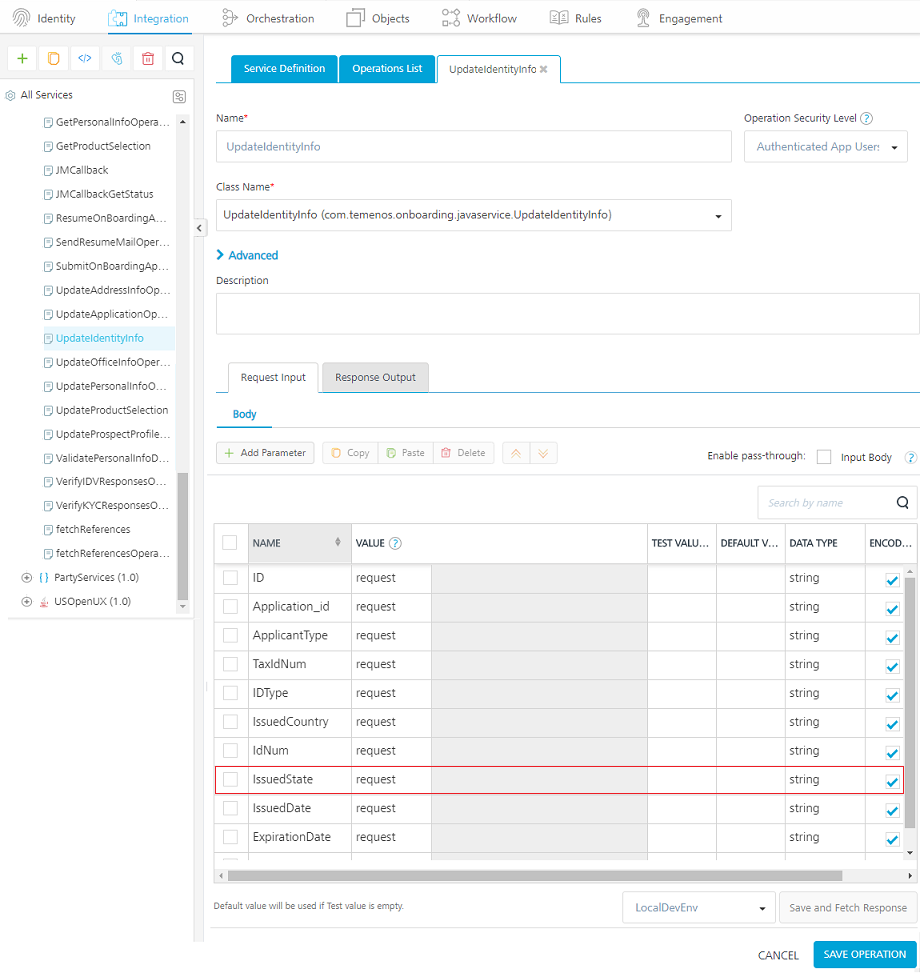
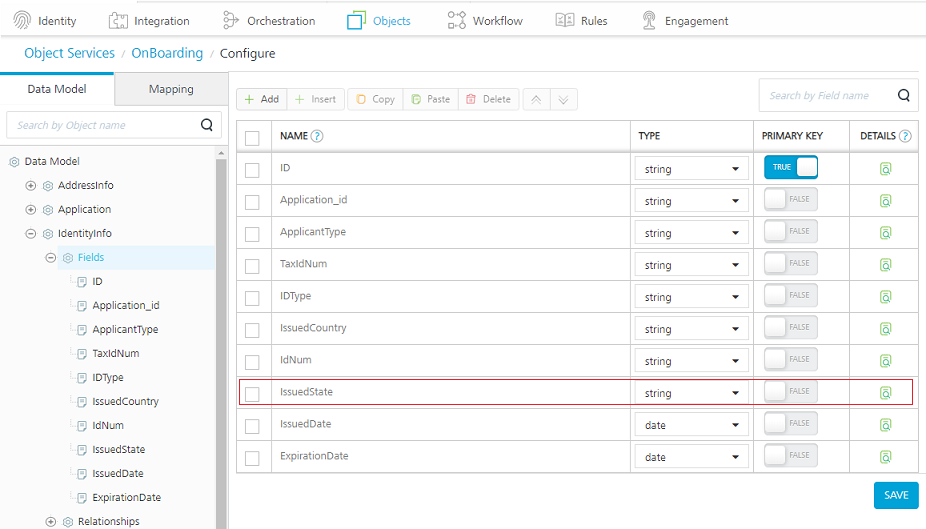
- Under the Integration tab, go to the OnBoardingJavaServices service definition and open the updateIdentityInfoOperation operation.
- In the Request Input tab, under Body, select the IssuedState parameter and click Delete.

- After deleting the IssuedState parameter, open the Objects tab, go to the IdentityInfo object model and delete the IssuedState entry under Fields.

- Save the changes and publish the application.
Journey Manager
After you implement the client application and server-side extensions, you must extend the Journey Manager functionality.
IMPORTANT: Ensure you meet the conditions mentioned in the Prerequisites section.
To extend the Journey Manager functionality, you must perform the following tasks:
- Updating the Form XML in the Journey Manager Application
- Updating the PDF Receipt
- Updating Workspace Tiles/Cards
- Updating Unit Tests
Updating the Form XML in the Journey Manager Application
To update the form XML data in the Journey Manager application with the Choose Issued State field, follow these steps.
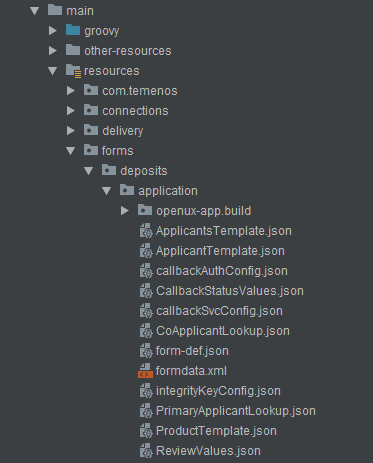
- Start the IDE and open the Infinity Journey Manager Application for the Onboarding project.
- In the IDE, go to src/main/resources/forms/deposits, and then locate the
form.xmlfile in the application and clone folders.

The form.xml file contains the XML definition.
- Edit the XML file and delete the entries that are associated with the Choose Issued State field from the applicant and co-applicant sections. Here, remove the <IssuedState/> entry as follows.
- For the applicant, delete this entry from the AvokaSmartForm/Application/Applicant/ Xpath.

- For co-applicant, delete this entry from the AvokaSmartForm/Application/CoApplicant/ Xpath.

- For the applicant, delete this entry from the AvokaSmartForm/Application/Applicant/ Xpath.
- Similarly, delete the <IssuedState/> entry from the
formdata.xmlfile of the Clone form.
Updating the PDF Receipt
To build and create receipts by using the Temenos Maestro design tool, refer to Journey Maestro.
Updating Workspace Tiles/Cards
To delete the Choose Issued State field, you must perform the following tasks in the Workspaces.
Application Data Look-up and Templates
To delete the Choose Issued State field, you must update the look-up data and the templates of the applicant and co-applicant. To do so, follow these steps.
- Open the Infinity Journey Manager Application for the Onboarding project.
- In the IDE, go to src/main/resources/forms/deposits/application and make the following configurations:
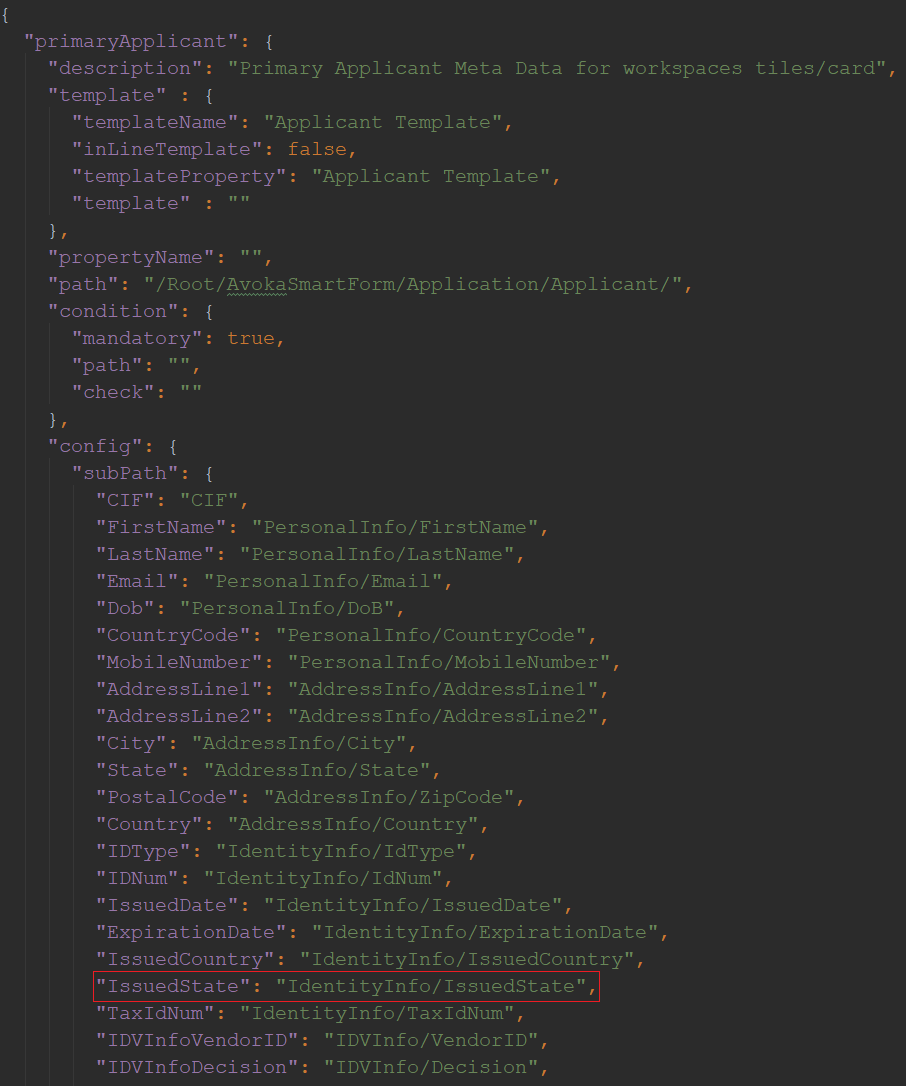
- Open the
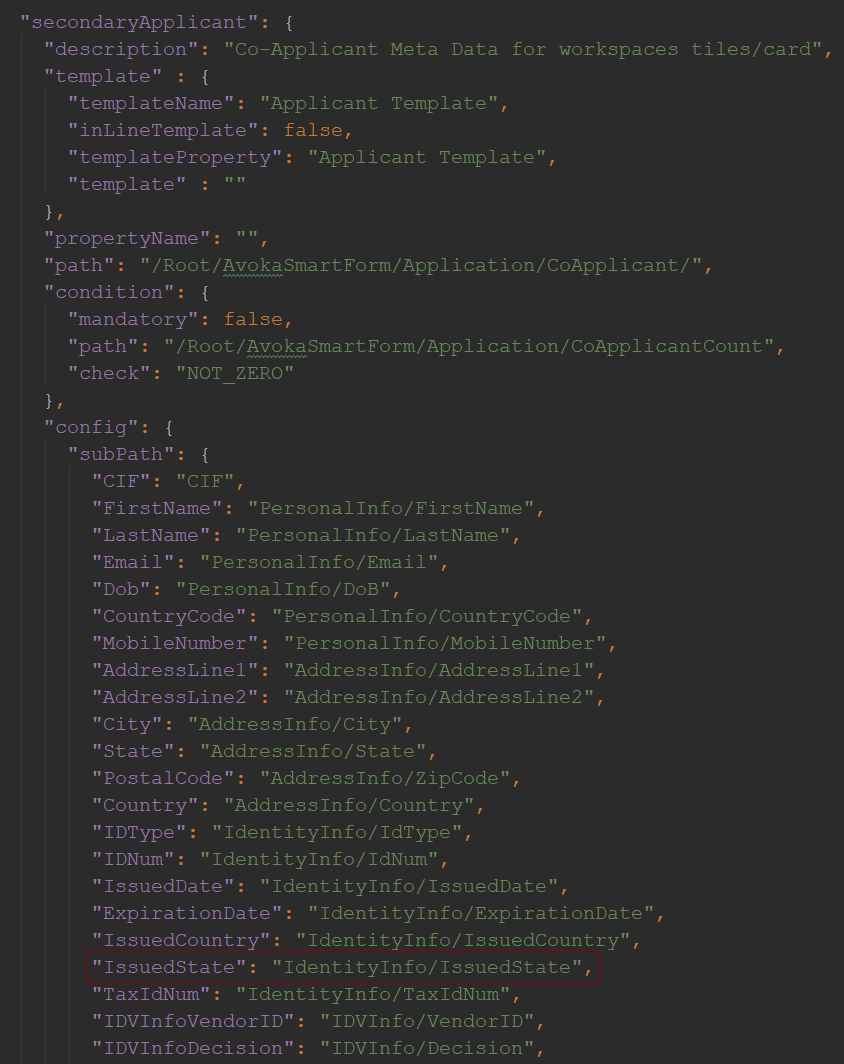
o MetaDataConfiguration.jsonfile, under primaryApplicant, search for the subPath section. Delete the entry associated with the Choose Issued State field.
- Similarly, under secondaryApplicant, search for the Sub Xpath section, and delete the entry associated with the Choose Issued State field.

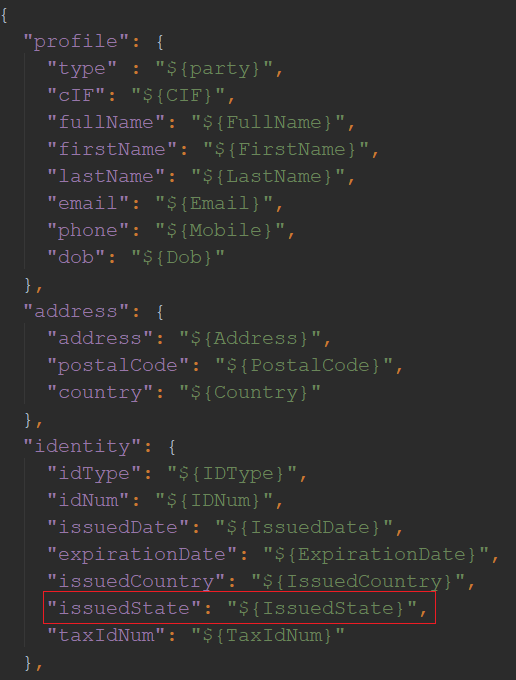
- Open the
ApplicantTemplate.jsonfile, search for the profile section, and delete the entry associated with the Choose Issued State field.The
ApplicantTemplate.jsonis updated because it relates to the templateProperty value in the primaryApplicant and secondaryApplicant sections.
- Open the
Workspaces Global Configuration and Spaces
To remove the Choose Issued State field, you must update the cached workspaces. To update the cached workspaces, you can use the existing tiles and cards. To do so, follow these steps.
- Open the Infinity Journey Manager Application for the Onboarding project.
- In the IDE, go to src/main/other-resources/spaces/properties.

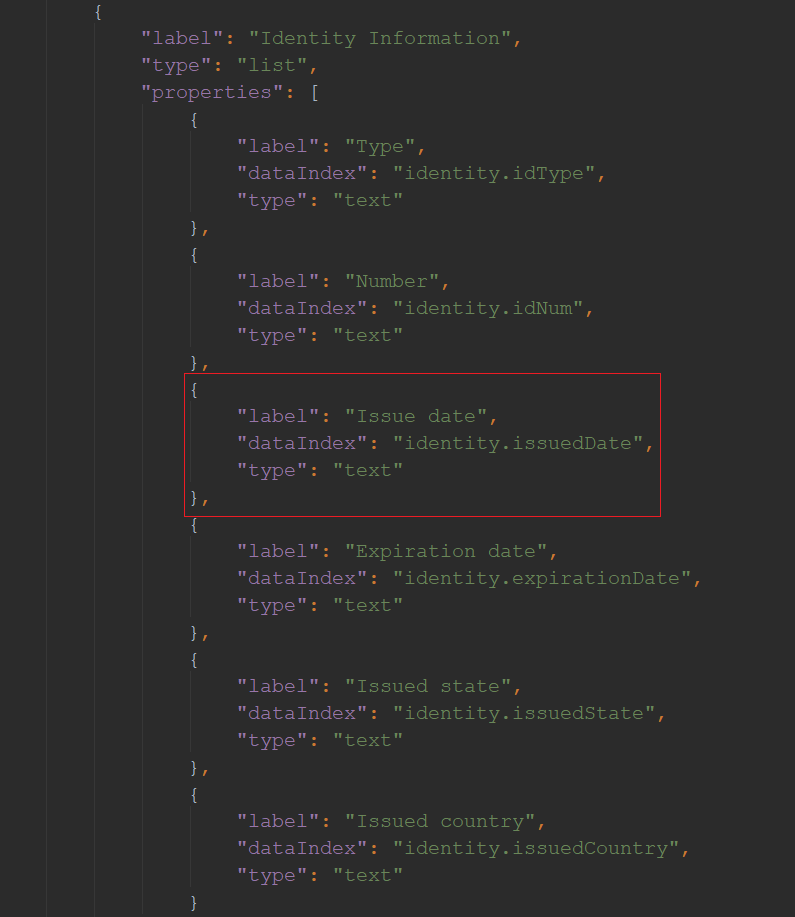
- Open the global.json file and search for the applicant's data by using the $applicants tag.

- In the $applicants function, search for the sections array and delete the following code.
{
	"label": "Issued state",
	"dataIndex": "identity.issuedState",
	"type": "text"
},
For more information about Journey Manager Workspaces, click here and for more information about the development guides, click here.
Updating Unit Tests
To automate the build process of CD/CI and complete the validation of earlier mentioned changes, you must configure the test data. To update and review the test data, follow these steps.
- Open the Infinity Onboarding Journey Manager project.
- Within the IDE, go to src/test/resources/com/temenos/ioj/bnk/job/action/meta.
- For the following files, make the changes that were mentioned for Application Data Look-up and Templates.
- ApplicantTemplate.json
- MetaDataConfiguration.json
- Review the test data of the XML file by updating the XML form. To do so, delete the IssuedState node from the following files:
- single-test-data.xml
- joint-test-data.xml
- noprods-test-data.xml
- single-test-bad-data.xml
- Go to test/groovy/com/temenos/ioj/bnk/job/action/meta and remove the additional test cases that were added from the WorkSpaceMetaDataTest.groovy file such as test for Birth Country present/not present. After updating the WorkSpaceMetaDataTest.groovy file, you can test and validate these changes, if required.
Add Bookmark
save your best linksView Bookmarks
Visit your best links BACK
BACK


Are you sure you want to log-off?